Staff Training Lab 4 - Git Good
Facilitator: Ben Cuan
7 min readTable of contents
Introduction
Welcome to week 4 of staff training!
At this point, if you’ve completed the previous few staff training labs you should have a pretty decent idea about how to navigate and use existing tools around the OCF.
Over the next couple weeks, we’ll extend upon that and get you ready to make your own!
About Git and GitHub
In a highly collaborative environment like the OCF, where many staff members may be editing the same codebase at the same time, we need a way to make sure everyone’s changes gets integrated successfully, and that if something ever breaks, we can easily roll back to a previous version.
Git is an industry-standard version control manager that allows us to do this, as well as many other things. If you stick around the OCF (or the software engineering industry in general), you will eventually get quite proficient at it just through normal usage, so don’t feel like you need to learn everything about Git all at once! For this lab, we’ll only go through the basics that you need to know to contribute; if you’d like to keep going at it see the [What next?][#what-next] section for more resources.
GitHub is an online platform where Git repositories can be uploaded and shared. Nearly all of the OCF’s code can be found on our GitHub organization, github.com/ocf.
Exploring the OCF GitHub
If you go to the OCF GitHub, you may see that we have nearly 100 public repositories (or maybe more, if you’re reading this in the future). That’s a lot of code!
Luckily, you won’t need to work with most of it. Here are the most important repositories that you should take a look at:
- puppet: Configurations for our servers and desktops. If you make a change to this repository, it gets automatically installed on all affected machines.
- ocfweb: The OCF website and web services. Also currently contains the OCF documentation (we are working on moving this to a separate repository).
- ocfstatic: The redesigned new OCF site. If you are interested in web development, you should contribute to this repository!
- etc: OCF configuration files used by multiple repositories; includes staff hours, virtual host lists, and more.
- ocflib: A Python library that allows for easy access to OCF utilities, some of which you used in previous labs.
Task 1
For this task, you’ll dig around the existing codebase to become more familiar with what might go where.
HINTS:
- The GitHub search bar is extremely helpful. Search a term within the organization, then click on the “Code” tab to view all instances of that keyword in the codebase. Use this as a starting point.
- The requested code snippets below are all found in one of the repositories mentioned above.
a. The OCF uses a shorturl system to make accessing common links more convenient (e.g. ocf.io/join, ocf.io/discord, etc). If you wanted to add a new shorturl, which file would you edit? (There should be a file with a list of them)
b. Which file contains the source code for the documentation page at https://new.ocf.berkeley.edu/docs/staff/getinvolved/? (Notice that it’s on new.ocf.berkeley.edu, NOT ocf.berkeley.edu).
c. If someone comes into the lab asking to add the virtual host name ofc.berkeley.edu, which file can you look in to see if it’s already taken? (There is a list of vhosts somewhere)
Making Pull Requests (Task 2)
Now that you’ve peeked around the current code, let’s get some practice changing it!
For the next exercise, you’ll add yourself to the staff page on the new website.
Setup
To get set up, follow these steps:
- Make sure you have a GitHub account and are logged in.
- Navigate to the ocfstatic repo and click the “Fork” button (see the image below).
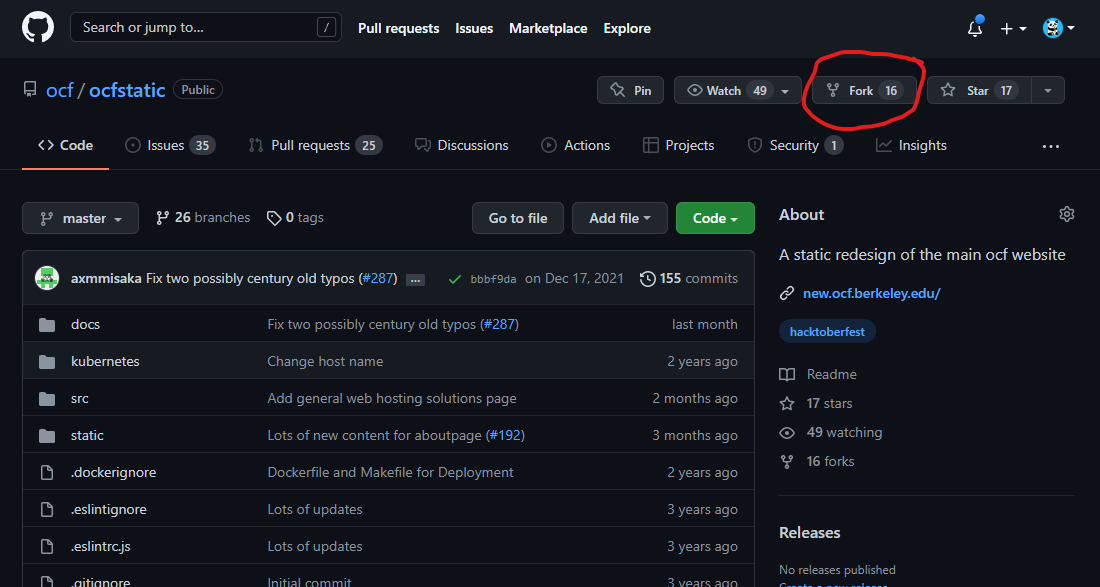
- Select your account, and when the fork is done, you should be on
https://github.com/YOURUSERNAME/ocfstatic. This is a copy of the ocfstatic code that you can edit however you wish without pushing it to the actual site. - SSH into supernova (as you have done in previous labs). Run the following command, making sure to change
YOURUSERNAMEHEREto your actual GitHub username. (git clone https://github.com/YOURUSERNAME/ocfstatic) - In the terminal, type
cd ocfstatic. If you now rungit statusit should say something like “nothing to commit, working tree clean”.
At this point, you have a local copy of the new website’s code loaded onto supernova! The next step is to make a new branch, which allows you to make changes while still having a copy of the original code (on the master branch). You can do this with the command git checkout -b BRANCHNAME. A good branch name might be something like add-YOURUSERNAMEHERE (replacing with your actual username, of course).
Editing
At last, you’re ready to make a change! You will need to edit this file. Try to use vim so you can get some practice with it (see b2 if you need a refresher), but it’s totally fine to use vscode, nano, or another editor if you are more comfortable using it. You can see the existing file contents to get a hint on how to add yourself (just make sure your ID is unique).
Git add, git commit, git push
When you have made the change and saved the file, go back to the ocfstatic directory and type git add .. Now, when you type git status, it should tell you about the file you modified.
Next, type git commit -m"YOUR COMMIT MESSAGE HERE". Try to make a descriptive message so others know what you did.
Finally, type git push. If it prompts you to do something with the --set-upstream option, just follow whatever it tells you to do instead.
Now, when you go back to your fork page on GitHub, you should be able to see a new branch in the branches list!
Making the PR
Go to github.com/ocf/ocfstatic/compare, and change your head repository and head compare to point to your fork and the branch you just made. The page should then display instructions on how you can create a pull request. Follow the instructions, and optionally write a nice message describing what you just did!
This PR should now appear in the pull requests list. A staff member with write access will review it to ensure the change was made correctly, and if it is, it will be merged into the original code and displayed on the website. Congrats on making a pull request!
Staff Hours (Task 3)
Now for a less guided exercise.
Try using the same process above to add yourself to the staff hours list here. You may want to pick a time where a veteran staffer is also holding staff hours, so you can hang out with them and learn more about how to run one yourself!
As a summary of the process:
- Fork the repository to your account
- Clone the fork to supernova
- Create a new branch
- Make the change
git add .,git commit -m"message",git push- Make the PR on GitHub
What next?
Although you may now be comfortable using many core features of Git, you may also be wondering what exactly each of these steps do! Here are some more resources to learn more about git:
- Decal Lab b9 and its corresponding lecture
- Git User Manual
- Atlassian Git Tutorial