Lab 8 - Security Fundamentals
7 min readTable of contents
For this lab, we will use GnuPG (also referred to as GPG), a free implementation of the OpenPGP standard. As stated by GPG’s website:
GnuPG allows you to encrypt and sign your data and communications; it features a versatile key management system, along with access modules for all kinds of public key directories.
The GPG manual page might be useful.
Encryption and Decryption
Encryption takes in a plaintext and a key, returning ciphertext. Decryption takes in a ciphertext and a key, recovering and returning the original plaintext only if the decryption key is valid. The keys for encryption and decryption are long strings of random bits that make it computationally infeasible for an attacker to guess the key and decrypt a ciphertext.
Symmetric Cryptography
In symmetric cryptography, the keys used for encryption and decryption are the same.
To try it out:
gpg --symmetric [FILE]on any file to output a[FILE].gpgfile which is the encrypted version of the inputted file. You’ll need to enter a password when encrypting the file.gpg --decrypt [FILE].gpgon the encrypted version of original file, upon which you’ll need to enter the original password.
In this GPG implementation, encryption and decryption of your file both require knowledge of a single password, which in this case serves as the symmetric key.
Asymmetric Cryptography
In asymmetric cryptography, two separate keys are respectively used for encryption and decryption. These two keys come in a public-private pair. The public key is made known publicly and used to encrypt data. Whereas, the private key is kept secret by the owner and used to decrypt data. Encryption of a file with a public key implies that only someone with the corresponding private key can the decrypt the resulting encrypted file.
GPG Keyring Abstraction
GPG uses a “keyring” as a centralized location to hold all of a user’s keys. You’ll need to add/import a key to your keyring if you wish to use it and keep it around. Similarly, if you wish to share a key with someone else, you can export your key (which makes a copy of your key) and have them import it to their keyring.
To try it out:
gpg --full-generate-keyto generate a GPG public-private key pair. It’ll ask for a password. If your machine is taking a while to generate a key, it may be due to a lack of entropy (randomness) that is needed for a long, random key.sudo apt-get install havegedwill install a daemon that generates entropy.gpg --recipient [RECIPIENT] --encrypt [FILE]which’ll encrypt[FILE]with[RECIPIENT]’s public key (for now, try encrypting a file with your own public key).gpg --decrypt [FILE].gpgwill search through your keyring and decrypt the file with the appropriate private key (if you possess the correct private key, of course). You don’t need to specify which key to decrypt a file with because GPG-encrypted files and keys contain metadata that allow GPG to pick the correct key from the keyring to decrypt the file with.
Signatures
The asymmetric scheme involving encryption with public key and decryption with private key can also be reversed to implement digital signatures whose role is equivalent to that of physical signatures. In this reversed scheme, the private key is used to sign a file, producing a signature on that file. And the corresponding public key is used to verify the signature. Therefore, only a person with the private key can produce a signature, but anyone with the corresponding public key can verify that signature.
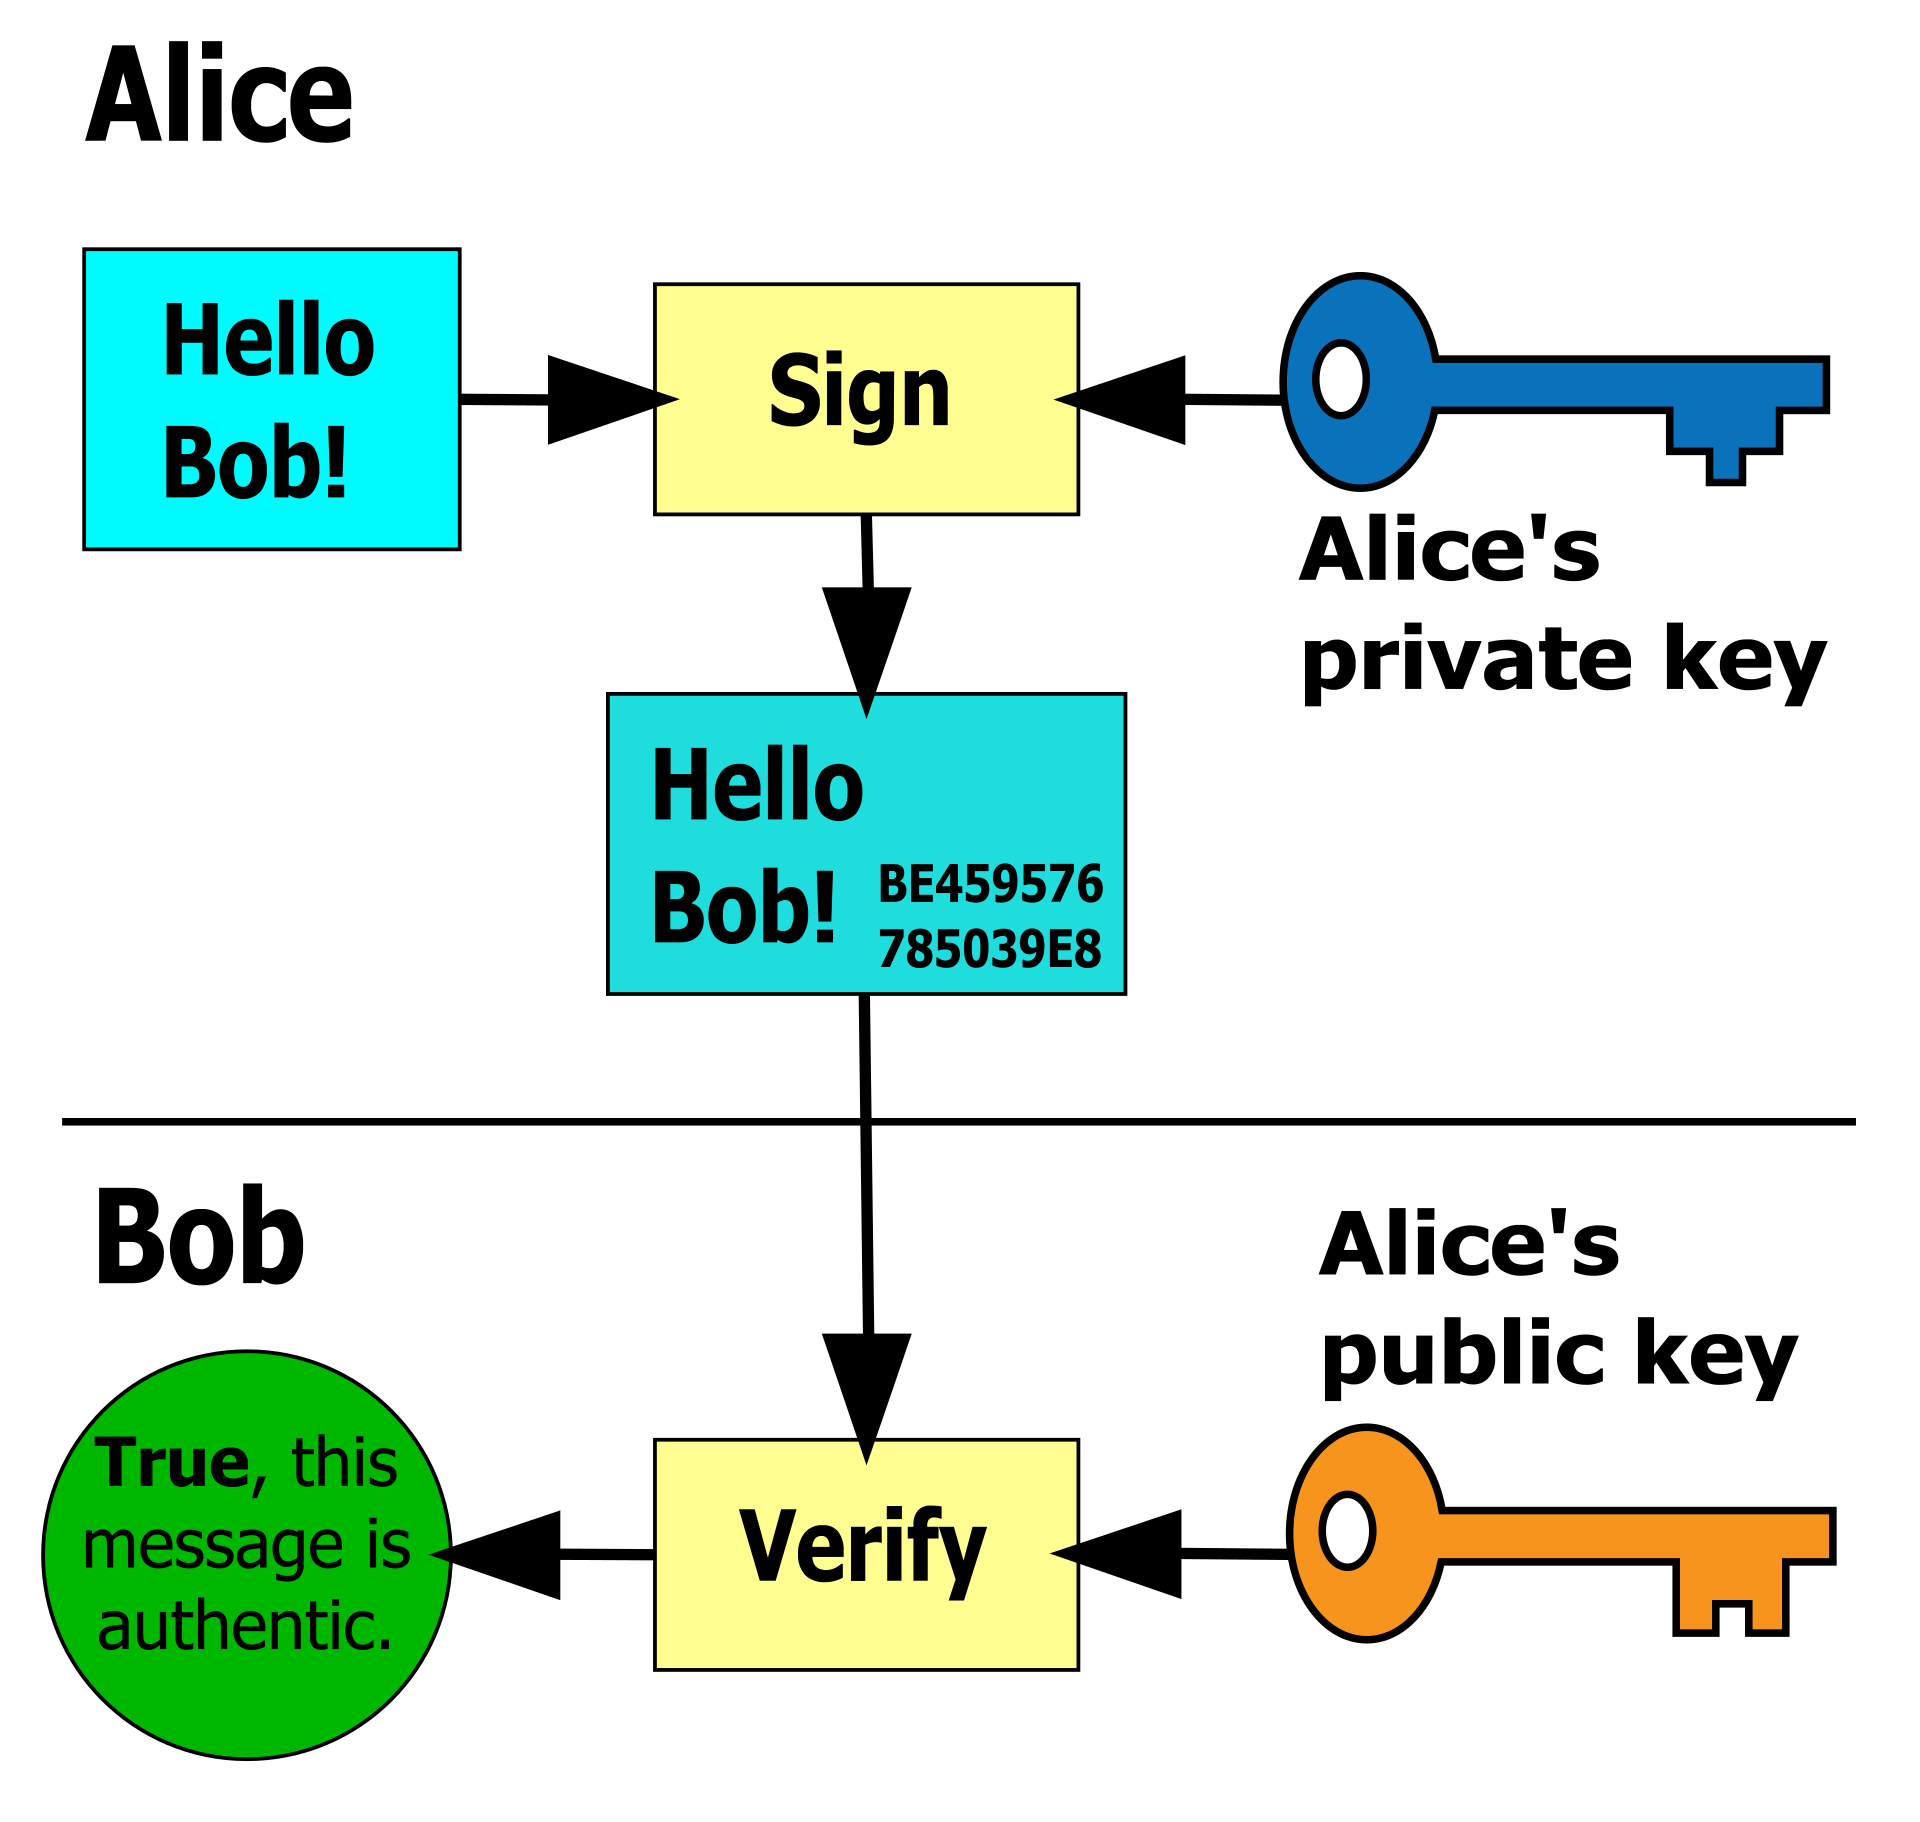
To try it out:
gpg --sign [FILE] to sign [FILE] with your private key. gpg --verify [FILE].gpg to verify that the file was signed by one of public keys on your keyring.
Hashing (Checksums)
Hash functions deterministically map arbitrary-length data to a fixed-length string of bits (AKA a hash). As a result, the latter can serve as a summary of the former if the former exceeds the latter in terms of byte length. For instance, if we download a 1GB file and want to verify its integrity, instead of re-downloading the entire file again, we can simply compute a 256-bit hash of the file on our end and compare it to the 256-bit hash of source, which is known as a checksum.
To try it out:
sha1sum [FILE]to get the SHA1 hash of[FILE].md5sum [FILE]to get the MD5 hash of[FILE].
There are many hash functions, only some of which satisfy the requirements of cryptographic hash functions. Crytographic hash functions primarily differ from their non-cryptographic counterparts in that they provide a property that make it computationally infeasible to forge a pre-hash file that maps to the same hash. If you are interested in all of the properties of a cryptographic hash function, read here. In particular, SHA1 and MD5 have been proven to no longer be cryptographically secure and are only used for checksums to ensure data integrity.
File Security
The UNIX permission model has 3 components: permissions given to the file’s (1) owning user, (2) owning group and (3) others/everyone else. Permissions themselves have 3 subcomponents: (1) read, (2) write and (3) execute, enforcing the ability to read, write or execute a file.
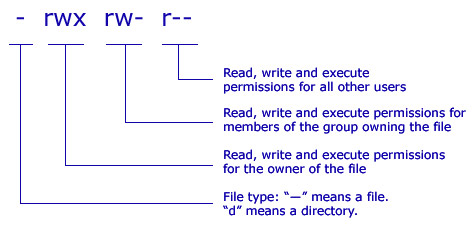
To try it out:
ls -lshows all the permissions of the current directory’s files in the leftmost column.chown [-R] [NEWUSER]:[NEWGROUP] [FILE]to change[FILE]’s user and group ownerships respectively to[NEWUSER]and[NEWGROUP].chmod [-R] [PERMISSIONS] [FILE]to set[FILE]with specified[PERMISSIONS].
Lab Checkoff
Submission
Submit answers to each question on Gradescope.
Setup
You should complete this lab on your student VM (username@username.decal.xcf.sh).
Once you’re connected to your VM, you’ll need to clone the decal-labs repository:
git clone https://github.com/0xcf/decal-labs.git
If you’ve already cloned decal-labs before, run git pull in your decal-labs directory to make sure all of your files are up to date.
Encryption and Decryption
- Decrypt
b8/file1.txt.gpgwith the passwordocfdecal(for real-life purposes, never store passwords in plaintext). What are the decrypted contents ofb8/file1.txt.gpg? - What command allows you to import a key?
- What command allows you to export a key to a file? (Add the
--armorflag to ASCII-encode the key so it can be sent easily in text form) - What command allows you to see all of the keys on your keyring?
- Use the private key
b8/lab8privkeyto decrypt the fileb8/file2.txt.gpg(for real-life purposes, it is necessary to keep private keys secret). What are the decrypted contents ofb8/file2.txt.gpg?
Hashing (Checksums)
- What is the MD5 hash of
b8/file3.txt? - What is the SHA1 hash of the MD5 hash of
b8/file3.txt? In other words, what isSHA1(MD5(file3.txt))?
File Security
Run sudo setup.sh from decal-labs/b8/ before beginning this section.
b8/file4.txt: What are the permissions of this file? Explain what they allow and disallow.b8/file5: Make this file executable and execute it. What is its printout?b8/file6.txt: Change this file to be under your ownership. What command did you use?b8/file7.txt: Make this file readable only to you. What command did you use?b8/file8.txt: Change this file’s permissions such that only root should be able to read this file and no one should be able to edit it. What command did you use?b8/file9.txt: Choose any method to make this file readable to you and unreadable to the previous owner. What command did you use?