Lab 9 - Security
Facilitator: Mark Zhang
34 min readTable of contents
- Overview
- Threat Models
- Security Building Blocks
- Encryption Lab Activity
- Footnotes
Overview
In this lab, we will cover a variety of topics that are of interest to those studying computer security. We will go much more in depth than you need to know, so we hope you pick up the main practical concepts and dig deeper if you are interested.
There are many aspects to security, and the field spans a number of disciplines. We will cover the following:
- Threat Models
- Security Building Blocks
- Encryption - Symmetric and Public-Key Crypto
- Certs, Signatures
- Hashing
- File Security
- Network Security
Getting help
If you want any help with any part of this lab, join the OCF slack/discord (https://ocf.io/slack), and post your questions in #decal-general.
Threat Models
The most important thing to remember when designing secure systems is understanding your threat model. No system is guaranteed to be secure or able to withstand all attacks, nor is this even possible in the face of extreme adversaries. However, you can (and should) take precautions against the threats you are likely to face. Balancing the need for authorized users to get access to the system while keeping unauthorized users out is very easy to get wrong. Fortunately, smart people have distilled the principles of security down to a few axioms, covered very well in the first lecture note of CS 161 (credit to Prof. David Wagner). It is recommended to read the lecture note.
When constructing a threat model, keep questions such as these in mind:
- What are you protecting?
- Who are your adversaries?
- How likely is it you will need to protect it?
- What are the consequences of failing to protect it?
- How many resources should you devote to protecting it?
Example: Safekeeping
Let’s say that you run a safe storage facility for customers to store a variety of valuables. Here’s a description of what your threat model might look like:
In this scenario, you’re responsible for your clients’ valuables. There are a multitude of adversaries, including burglars ranging from smash-and-grab to more sophisticated attackers, disgruntled employees, clients looking to claim fradulent loss, and natural disasters such as earthquakes, fires, or tornados.
Storage facilties containing potentially high amounts of valuables in close proximity to each other may serve as enticing targets for attackers and failing to protect the facility would result in a loss of trust that would be devastating for a business.
In order to protect against burglars, an variety of protections can be enabled from increased surveillance to 24/7 guards. The rational amount of security depends on the level of desired profit and likelihood of a break-in.
Allowing clients to install their own security protects allows them protection against both disgruntled employees and acts as a protection mechanism against fradulent clients.
Task 1: Construct your own threat model
You’re a journalist criticizing the local authoritarian government and trying to get your story to ProPublica. Considering the principles of security and the above questions, describe your threat model and how you would safely deliver the information.
Security Building Blocks
Encryption
A Brief Introduction
Hiding information from unauthorized users is a critical element of computer security. How can you make sure we can keep this information hidden in the case that we have to send it out into the open?
Here’s where the power of encryption comes in. Encryption involves taking the information you want to hide, called the plaintext, and scrambling it into a format that can only be read with a key called the ciphertext.
Types of Encryption
There are many different types of encryption algorithms, with different types of encryption keys, encryption speeds, security, and usefulness. The most important quality of encryption algorithms is the fact that they are one-way: it is easy to compute the ciphertext from the plaintext (encrypt) but extremely difficult to compute the plaintext from the ciphertext (decrypt) without the secret key.
There are two primary types of encryption: symmetric key cryptography, and asymmetric-key or public-key cryptography. The invention of public key cryptography was critical to many of the security features we take for granted today.
For the purpose of this lab, we will be using several tools for performing encryption operations, among them GnuPG, a free implementation of the OpenPGP standard, and OpenSSL, a library for implementing TLS, or Transport Layer Security.
Symmetric Key Cryptography
Symmetric-key cryptography is named for the fact that a single key both
encrypts and decrypts a particular plaintext to ciphertext and vice-versa. The
most widely used method of symmetric crypto is AES, or Advanced Encryption
Standard, which is certified and trusted by the US Government to encrypt
information critical to national security. An easy way to visualize the basics
of symmetric key crypto is by the XOR function: a XOR b is true if and only
if a and b are different. Suppose our plaintext is the bitstring
100110100101, and we want to apply a bitwise XOR with the bitstring
010010100010, which is our key. The result of this operation is
110100000111. If we XOR the resulting ciphertext with the key again, we get
the original plaintext: 100110100101. The XOR function is trivially
reversible, but military-grade symmetric key cryptography algorithms are much
more difficult to reverse. The security of symmetric-key crypto, therefore, is
dependent on keeping the encryption key secret.

Symmetric key crypto is useful for almost everything, especially things that fall in these categories:
- Encrypting data in transit (such as HTTPS)
- Encrypting data at rest (like data stored on your phone)
As an example, let’s explore how iPhones use encryption to keep your data safe:
- The iPhone’s internal storage is encrypted with a set of AES keys stored on a chip inside the phone, generated at the factory.
- These keys are in turn encrypted with your PIN. Your PIN allows the phone to unlock the keys that allow it to decrypt the rest of the filesystem.
This is how the iPhone is able to quickly wipe your data in the event your phone is stolen: the phone simply deletes the keys that are stored on the internal chip. Now, even with your PIN, there are no keys to decrypt and the encrypted data in the phone’s storage is, for all intents and purposes, irretrievable and indistinguishable from random data.
Public Key Cryptography
Unlike symmetric key cryptography, there are 2 keys in a public-key cryptosystem, the public key and the private key. As the name suggests, the public key is shared publicly, and this is the means by which other people encrypt data that’s meant for you. You use your private key to decrypt this data. As long as no one has your private key, anyone can use your public key to encrypt data and be assured that only you can decrypt it. This is a powerful expansion on the symmetric-key paradigm, as beyond encryption, it also allows for signatures and non-repudiation: a way for someone to verify that the person they are talking to is in fact the person they intend to be talking to, and for someone to prove (without the ability to deny it) that they are who they say they are.
Nowadays, public-key cryptography is synonymous with the RSA algorithm, which was one of the first proven dual-key schemes. (You will encounter the RSA algorithm in CS 70 and CS 161 if you plan to take those courses, or already have.) In short, the security of RSA depends on the theoretical difficulty of factoring large numbers on conventional computers. This is expected to continue to be a difficult problem until quantum computers become practical.
Here’s a brief overview of how RSA public key crypto works:
- The RSA algorithm, by means of some advanced mathematics (involving prime numbers and modular arithmetic), returns 3 numbers: a public exponent (aka key), a private exponent, and a modulus. The two keys work such that data encrypted with one key can only be decrypted with the other key.
- In order to encrypt data, one performs modular exponentiation over the data using one of the exponents and the modulus.
- In order to decrypt data, one performs modular exponentation on the encrypted data with the partner key and modulus. In common use, one uses the larger exponent as the private key, which is used for decrypting data and creating signatures, and the smaller exponent as the public key, which is used for encryping data and verifying signatures.
In lab a4, one task was to generate an SSH key, using the command:
ssh-keygen -t rsa -b
4096
This command would generate two files, ~/.ssh/id_rsa and ~/.ssh/id_rsa.pub.
As the command suggests, this command generates a 4096-bit RSA key pair. You
should be able to guess which file represents the public key and which one must
therefore be the private key. In order to affect secure SSH logins using the
RSA key, the user must first transfer the public key they wish to use to
identify themselves to the server in advance. Then, once a session has been
established between the server and the client, the server will encrypt a random
number with the user’s public key and transmit it to the user. The user will
then decrypt the value using their private key and return a hash of that value
to the server, who can then hash the value themselves to determine if the user
was able to successfully decrypt the random number, thus indicating posession
of the matching secret key and serving as proof for authentication.
Signatures and Certificates
Public key cryptography allows for a number of important security objects, including signatures and certificates for digital identity verification.
Suppose you are an important public entity (maybe your pseudonym is Natoshi Sakamoto). You are in charge of an important project, hereafter known at Litcoin. You’d like to maintain anonymity, but still need to lead your project.
How can your loyal followers know that statements supposedly made by Natoshi Sakamoto are actually from you?
There’s a significant incentive to make false statements supposedly “from” Mr. Sakamoto, because each Litcoin is apparently worth a significant amount of real money, and some people stand to gain substantially if they are able to influence the direction of the project in their favor.
You can avoid this by signing your messages: in the beginning, you would publish Natoshi’s public key, and thereafter, for every post you make, you would encrypt the content of the message using your (Natoshi’s) private key and post that along with your original message. Then, anyone who wants to verify that Natoshi (i.e. the owner of the private key corresponding to the public key that belongs to Natoshi) did in fact publish a particular message can simply use Natoshi’s public key to decrypt the encrypted signature and compare the content against the original message.
Pretenders to Natoshi’s throne will be unable to sign their false statements such that they can be verified with Natoshi’s published public key because they don’t have Natoshi’s private key, and you can rest assured that no one will unduly influence your project in your name while you go into hiding from the IRS and DEA, unless they happen to have warehouses full of ASICs and lots of cheap electricity.
However, in this scheme, how do you prevent an adversary from publishing a fake public key and claiming to be you? (they can make valid signatures against that fake public key) Somehow, you need to “bootstrap” trust: someone would need to verify your identity and publicly affirm that your public key actually corresponds to you.
We do this by means of certificates: a signed statement claiming that a particular public key does, in fact, belong to who it claims to belong to.
Who signs this certificate? A certificate authority, someone we trust to be responsible about verifying identities and issuing signatures.
But how do we know which CAs to trust, and how can we trust that a CA that claims to be trustworthy actually is? They probably need a certificate as well. It sounds like it might be turtles all the way down; however, the chain does end somewhere: the so-called root of trust, the root CAs. These are the CAs whose certificates are pre-installed by browsers and operating systems and therefore intrinsically trusted, without any further certificates necessary. If a root CA signs your certificate, we assume they’ve done the due diligence necessary to be willing to risk their reputation by signing your certificate, and basically take their word for it. This model, known as the Web of Trust, is how network security works today.
Unfortunately, it isn’t as reliable as we may have hoped: some CAs are scummy and will sign anything for enough money, resulting in valid certificates being issued for domains like microsoft.com and github.com to entities who are very obviously not Microsoft or GitHub.1 Furthermore, any entity with enough border control can force the installation of their own root certificates (e.g. the government of Kazakhstan2) and intercept any traffic by issuing their own bogus certificates for any domain.
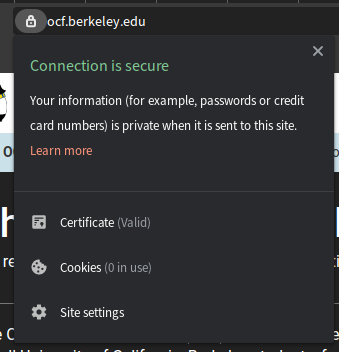
You might not realize it, but you use and rely on certificates and signatures every day. Any time you see a green lock near the address bar of a website you visit, you are accesssing the site over a TLS or HTTPS connection, and the data being transferred between you and the website is encrypted. When your browser connects to the website’s server, it asks for the server’s public key in order to set up an encrypted connection, and the server’s certificate in order to verify its identity as the server authorized to serve the domain you have requested. Your browser then validates the public key by verifiying the signatures on the certificate. If someone is attempting to perform a man-in-the-middle attack on you, this certificate verification step will fail, because it should be unlikely that a trusted CA will have issued a signed cert for your domain to an entity other than you (unless you have the misfortune of living in Kazakhstan). You will get a very intrusive notification informing you of this fact, and it is a bad idea to ignore the certificate verification failure notification.
Hashing
There are many times where we have large amounts of data but need to operate on
smaller representations of that data. For example, suppose you download a 1GB
file from the internet. You want to make sure that the file you downloaded has
not been modified on its way to you (after having taken the DeCal, you know
that integrity is a critical goal of computer security). How could you figure
out if the file has been changed? You could try downloading another copy to see
if there’s a difference, but both copies could have been modified, and it takes
a long time to download 1GB. You could use your knowledge of signatures to see
if the source has provided a signature of the file you could verify, but the
signature would have to be over the whole file3 and this is even more
expensive. What we really need is a deterministic way to generate fixed-length
representations of arbitrary-length data. Luckily, mathematics has our back
with functions known as hash functions. If you took CS 61B, you probably
implemented a hash table at some point, and may be familiar with the concept.
Here’s an example of hash functions at work. Enter the following commands on
your student VM (i.e. ssh username.decal.xcf.sh) to calculate the SHA14
hash of a 40MB file.
wget https://raw.githubusercontent.com/0xcf/decal-labs/master/a9/lab9.jpgsha1sum lab9.jpg
You should see 685e925838358fdc162935588c6ee0aa5a5caed6, a 40-digit string.
As you can imagine, transferring this string is much easier than transferring a
large, 100MB file, and because of the properties of the SHA-1 algorithm, you
can be reasonably sure that this file, and only this file, will always hash to
that particular value. This means, if you want to verify that the file you
downloaded hasn’t been corrupted, you can simply compare the hashes (or more
specifically, a signature over the hash) to ensure that the file you’ve
downloaded hasn’t been tampered with.
Encryption Lab Activity
In this lab, we will be exploring the topics covered so far: symmetric encryption and public key cryptography, hashing, signatures, and certificates. Please make sure you are logged into the appropriate server over ssh prior to completing any of the following tasks.
Submission
Remember to submit your answers to Gradescope as you complete the lab!
Introduction: Making SSH keys
We’ll begin our exploration of security building blocks by creating SSH
keypairs for ourselves, in case you haven’t already. If you already have an SSH
key on your personal computer that you would like to continue to use, or one on
tsunami, feel free to skip these steps and proceed to task 1, but please make
sure that you can use that key to log into your student VM.
As mentioned earlier in this document, and in lab a4, here is how to create a 4096-bit RSA SSH keypair:
- Log into
tsunami.ocf.berkeley.eduwith your OCF account credentials (potentially not the same as your decal VM credentials). It is important you do these steps ontsunamiand not your laptop, an OCF desktop, or your decal VM. - Check to make sure you do not have an existing SSH key:
- Enter
ls -l ~/.ssh - If you see files like
id_rsaorid_rsa.pubthen you already have an SSH key.
- Enter
- If no key is present, create a new key now by typing
ssh-keygen -t rsa -b 4096, and hit enter when prompted. - If you are asked to type a password to protect the key, you may choose to enter one, but for the purpose of this lab, it is advisable to skip doing so.
You should now see two new files in the ~/.ssh/ directory. id_rsa is your
SSH private key, and it should like the following:
$ cat ~/.ssh/id_rsa
-----BEGIN RSA PRIVATE KEY-----
<random characters>
-----END RSA PRIVATE KEY------
Please try to not lose or leak this private key. The public key, id_rsa.pub,
should be much shorter and look like the following:
$ cat ~/.ssh/id_rsa.pub
ssh-rsa <characters> <username>@<host>
It is safe to transfer your RSA public key out in the open, whereas you should never do so with your private key. It should only be transferred over trusted and encrypted communication channels over machines you trust.
You’ve just created for yourself an RSA keypair suitable for SSH authentication.
For the remaining tasks in this lab, you will be tasked with figuring out the appropriate commands yourself, by Googling, reading man pages, etc. Hints will be given as footnotes as necessary. Please document the commands you use and be prepared to provide a rationale for why you believe those commands are correct.
Warm-up Task
Figure out how to use the SSH key you’ve created to log into your student VM.5
Perform the remaining tasks on your student VM unless otherwise specified.
Task 2 - Symmetric Encryption
In order to explore encryption, we’re going to be using the gpg command.
-
Download6 the file named
q2.txt.gpgfrom github, decrypt it usinggpgand the passwordweak_password. What is the decrypted content? -
Create a text file with your full name, username, and some random content in it. Then, use
gpgto symmetrically encrypt this text file using the TWOFISH algorithm and a password of your choice. Make sure the resulting encrypted file is in ASCII-armored format7.What command did you use to do this?
Task 3 - Asymmetric Encryption
Remember to perform all the following steps on your student VM.
In this task, we will be using gpg to create a PGP key.
Step 0: Figure out how to do make this key8, and create a 4096-bit RSA/RSA PGP key.
You might be wondering: didn’t we just create a 4096-bit RSA key for use in SSH? Why can’t we just use the same key for GPG? The short answer is that, while technically possible, it is inadvisable to do so for security reasons.
-
After creating the key, retrieve the key ID and put it in the checkoff form.
-
Export the public portion of the key in ASCII armor format and figure out how to distribute it. For every subsequent step, make sure to do everything using ASCII armored output where applicable.
-
The DeCal staff have a public key available. Figure out how to import the key, and write down the key id.
-
The DeCal staff have uploaded a few files called directions to help you figure out how to get to the OCF. However, we suspect nefarious elements may be trying to modify the file in an effort to divert students to their location. Figure out if the file has been modified. (Hint: Check the signature!)
-
Where is your private key located? Write down the location where you expect the private key to be.
We will return to encryption later in the lab.
Task 4 - Hashing
Fortunately all the common hashing algorithms have been implemented for us by various libraries. For this lab, please compute the requested hashes by any method you deem appropriate. It would be advisable to do these on an OCF desktop, or on your student VMs, but not on tsunami, because this leaves around a large file that takes up extra space if not cleaned up.
-
Download a copy of the CentOS 7 NetInstall ISO from the OCF mirrors and verify that its SHA256 hash is correct. Also compute its SHA1 and MD5 hashes.
-
You may have noticed that the CentOS project provides a signature over the hashes it provides (the .asc file in the same directory as above). Briefly explain why this is a good, efficient security measure, knowing what you do about how signatures, hashing, and malicious attempts at file corruption work.
File Security
Now that you have some experience with the primitives of encryption, let’s cover some practical topics in securing files on UNIX-based systems.
File Security and Permissions
The base layer in the UNIX security hierarchy is file permissions. Every file
and process is owned by a user (and group), and by default, only the user/group
that owns the file can edit it. You can see this by typing ls -la in your
terminal:
admin@staff:~$ ls -la
total 104
drwxr-xr-x 9 admin admin  4096 Oct  3 13:01 .
drwxr-xr-x 5 root  root   4096 Oct  2 16:49 ..
drwxr-xr-x 2 admin admin  4096 Sep 21 21:11 .augeas
-rw------- 1 admin admin 27932 Oct  6 14:05 .bash_history
-rw-r--r-- 1 admin admin   220 May 15 12:45 .bash_logout
-rw-r--r-- 1 admin admin  3526 May 15 12:45 .bashrc
drwx------ 3 admin admin  4096 Sep 17 12:02 .config
drwxr-xr-x 4 admin admin  4096 Oct  3 12:47 .gem
drwxr-xr-x 2 admin admin  4096 Oct  3 12:46 .nano
-rw-r--r-- 1 admin admin   675 May 15 12:45 .profile
drwxr-xr-x 4 admin admin  4096 Sep 17 14:23 .puppet
drwx------ 2 admin admin  4096 Sep 17 12:09 .ssh
drwxr-xr-x 3 admin admin  4096 Oct  3 12:38 test
-rw------- 1 admin admin 21980 Oct  2 16:42 .viminfo
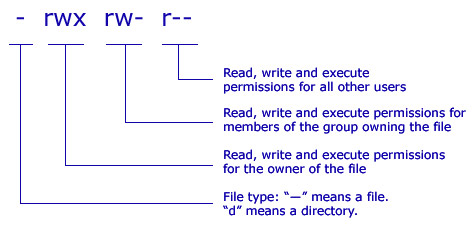
The first column, e.g. -rw-------, is the read/write/execute permissions for
the file. The third and fourth columns are the user and group that own the file.
Let’s break down the permissions seen in the example above. You’ll notice that
there are 10 entries: they either start with d for directory or - for
regular files9, the the remaining 9 entries are split into 3
groups of 3 permission each: read, write, and execute for uuser,
group, and other. That means -rw------- refers to a regular file, where
the owner can read and write but not execute the file, and no one else can
either read, write, nor execute the file. On the other hand, the permissions
on the test entry (drwxr-xr-x) indicate that it is a directory, everyone
can enter the directory (d--x--x--x), anyone can list files inside the
directory (dr--r--r--), but only the owning user can write files inside the
directory (d-w-------). A key point to remember is the difference between
execute permissions on files vs. directories: on directories, it refers to the
ability to enter the directory.
The kernel enforces file permissions, preventing running programs from reading
or modifying files they aren’t allowed to, and preventing users from executing
programs that they don’t have access or permission for. This is important for a
variety of reasons. For example, certain UNIX user accounts have their
account information stored in a file called /etc/passwd and password hashes
in /etc/shadow. These files are owned by root, preventing regular users
from reading or changing this information without permission.
❯ ls -la /etc/shadow
-rw------- 1 root root 861 Oct  9 02:22 /etc/shadow
This highlights a common security issue in UNIX: programs running as the root
user. When a program is started, it inherits its user and group IDs from its
parent process, and keeps them unless it manually drops permissions. If you
start a program as the root user, because, for example, it requires deeper
system access, a vulnerability in the program means that an attacker can
interact with your computer as the root user. This is a common problem in
misconfigured webservers, where a server running as root with a directory
traversal vulnerability might allow an attacker to read secret credentials
stored on the server’s filesystem.
The moral of this story is tied to the principle of least privilege: wherever possible, only give the minimum amount of permission or privilege possible. If a program doesn’t need root credentials, don’t run it as a privileged user. If a file has sensitive content, don’t make it world-readable.
How do you change permissions? There are two primary commands for doing so:
chmod and chown. chmod changes the file mode, i.e. permissions, and an
example of its syntax follows:
$ ls -la ~/
drwxr-xr-x 3 admin admin  4096 Oct  3 12:38 test
$ chmod 644 test
$ ls -la
drw-r--r-- 3 admin admin  4096 Oct  3 12:38 test
$ chmod u+x test
drwxr--r-- 3 admin admin  4096 Oct  3 12:38 test
$ chmod 000 test
d--------- 3 admin admin  4096 Oct  3 12:38 test
$ chmod +r test
dr--r--r-- 3 admin admin  4096 Oct  3 12:38 test
chmod accepts file permissions in octal notation, which is the
following:
| # | rwx |
|---|---|
| 7 | rwx |
| 6 | rw- |
| 5 | r-x |
| 4 | r– |
| 3 | -wx |
| 2 | -w- |
| 1 | –x |
| 0 | — |
chown on the other hand changes the owner and group of a file. For example,
suppose a file instructions.txt is created in your home directory (~you) by
user staff with permissions -rw-------. You need to read this file to
follow the instructions, but the staff user did not make the file
world-readable so you could open it. In order to read it, you may first want to
chown the file to yourself, by running chown you:you instructions.txt. This
would change the file’s owner and owning group, previously “staff” and “staff”,
to you. The basic syntax of chown is fairly simple:
chown [-R] [user]:[group] PATH
where PATH is the file or directory whose ownership you wish to modify, and -R
means ‘recursive.’
Making sure that files are only accessible to those who should be allowed to do so, and that vulnerable programs are not given too many permissions, is a critical part of maintaining system security on Linux.
Task 5 - File Security
Lets practice using the commands and concepts covered above.
Please answer the following questions with regards to some arbitary files, and make note of what commands you would use for checkoff. It’s recommended to play around with those commands on your own.
Let’s say you have a file:
- How would you make that file readable to you?
- What if the file is very important, as it contains decal secrets. Use
chmodandchownto make the file readable only to you. - Lets say we have an even more important file. Only root should be able to read this file, and no one should be able to edit it.
- Lets say
file4.txtandfile5.txtare files are owned by another user. Choose any method to make the files readable to you and unreadable to the previous owner. - Lets say we have two files,
filea.txtandfileb.txt: provide a strategy to make these files readable only to you and thedecaluser, and no one else.
Network Security
On UNIX based operating systems, the network is the most common method of gaining unauthorized access to a machine. Why this is the case should be obvious: the network allows one to interact with a machine without needing any physical presence. Anyone on the same network as your machine can connect, and therefore attack, your machine. On the internet, this means the whole world can attack your machine. This introduces a number of security considerations when running networked applications.
The first step in securing machines connected to a network, or the open internet, is to make it as hard as possible for attackers to get to your machine. As you may recall from the networking lecture, processes interact with one another over a network by means of sockets and ports. Many protocols listen on well-known ports, such as SSH on port 22, HTTP on port 80, FTP on port 21, etc. We use firewalls and similar software to prevent unauthorized users from connecting to your machine.
The second step in maintaining network security is to audit which programs are
running on your server, and to design your network to reduce the attack vectors
on any single machine by separating concerns as much as reasonably possible.
For example, it may not be a good idea to run a critical database server and a
potentially insecure webserver on the same machine, as a vulnerability in one
could easily lead to the compromising of the other. At the very least, all these
programs should be run as minimally privileged users, and never as root unless
necessary, like sshd.
Finally, the hardest part of online security is auditing your own code. Ultimately, most security vulnerabilities arise from code you need to run to affect your business functions. For example, the popular CMS software WordPress, which is estimated to power nearly a quarter of all websites, has historically been extremely vulnerable to security bugs, especially because people like to install WordPress plugins, often written by amateur coders, which are even less secure. Unfortunately, the only real defense against one’s own imperfection as a programmer is to be vigilant about monitoring one’s programs for vulnerabilities and servers for intrusion, and following good defensive programming practices on the road towards the impossible goal of secure, bug-free programs.
Task 6 - Network Security Lab Activity
-
Make a list of all the services running on your student VM that are accessible from the public internet, what user they are running as, and what port they are listening on. You may find tools such as
netstatandpsto be helpful. You may also want to pointnmap -Aat your VM from another machine, such astsunami. -
Use
lessandgrepto open up and search your SSH login log file, located in/var/log/auth.log. Besides yourself, is anyone trying to log in? Who and why if there is?
Optional Task: Letsencrypt on an nginx instance!
This task is somewhat involved and completely optional. With that said,
being able to use certbot to provision certificates is an invaluable skill that
you will likely need when setting up your own webservers. If you ever need to do this
in the future, you know where to find a guide! :)
In this task, we’re going to set up one of the most common uses of certificates and signatures: HTTPS. As you might have realized, you are now in possession of a website and webserver, (<you>.decal.xcf.sh), at least for the time being. Perform the following tasks on your student VM.
Suppose you want to start hosting files on your site for other people to visit and see.
First, install the nginx package to get a web server, and then customize the
file at /var/www/html/index.html to reflect your indiviuality. You can see
this new file at <you>.decal.xcf.sh in a web browser.
Now that you have a website, you decide that, as a good internet citizen, you want to protect your visitors from the prying eyes of the government, by setting up HTTPS. You know already that you will need a public key and a certificate signed by a trusted root CA in order to do this. How do you go about getting one? Searching the internet, you find a wonderful project called Let’s Encrypt that provides free, signed certificates. Let’s go about acquiring one.
For the purpose of this lab, we will be performing all the required steps manually instead of using the automated tools for educational purposes.
-
The first step in acquiring a signed certificate is to generate the public and private key that the certificate will validate. We can do so by using the
opensslcommand.$ openssl genrsa 4096 > domain.keyAs you probably guessed, we just created another 4096-bit RSA keypair, this time, in PEM format. Both the public and private keys are encoded in the file
domain.key, which you can see usingcat. -
For Let’s Encrypt, we’ll also need an another key for our Lets Encrypt account. Repeat the command from above, but this time, output to a file called
account.key.10 Let’s also export the public portion of this key as you’ll need it soon when you authenticate to LetsEncrypt.$ openssl rsa -in account.key -pubout > account.pub -
Now that we have a keypair that we want signed, (
domain.key), let’s generate a “Certificate Signing Request” for it. This will be what you send to Let’s Encrypt in order to get a certificate for your public key. It contains the metadata necessary for LE to issue a certificate.$ openssl req -new -sha256 -key domain.key -subj "/C=US/ST=CA/L=UC Berkeley/O=Open Computing Facility/emailAddress=<you>@ocf.berkeley.edu/CN=<you>.decal.xcf.sh" -out csr.pem -outform pemYou’ll find a file in your directory called
csr.pemthat starts withBEGIN CERTIFICATE REQUEST. What did you just do? You asked for a-newcertificate signingrequest for the public-keyindomain.key, using-sha256for hashing. You are <you>@something from the OCF at UC Berkeley, CA, US, and you’re making this request for the domain name (akaCommonName) <you>.decal.xcf.sh. You’d also like the CSR to be inpemformat.Now, we have all the data we need to actually get a certificate. Let’s submit the request to Let’s Encrypt.
-
Install the
certbotutility and do the following:Enter the following command at a terminal:
 sudo certbot certonly \
      --authenticator manual \
      --text \
      --email <you>@email.address \
      --csr csr.pem
You will be asked to answer some questions, read them and type “Y” when prompted. On the last prompt, you will be asked to make a file available in the root directory of the web server, either by copying the file yourself or by executing the Python code provided by the
certbotprogram. It is recommended to use the Python code in a new terminal window. Here is what the code should look like: (do not copy and paste this, use the code provided bycertbot)# mkdir -p /tmp/certbot/public_html/.well-known/acme-challenge # cd /tmp/certbot/public_html # printf "%s" <random> > .well-known/acme-challenge/<random> # run only once per server: # sudo $(command -v python2 || command -v python2.7 || command -v python2.6) -c \ "import BaseHTTPServer, SimpleHTTPServer; \ s = BaseHTTPServer.HTTPServer(('', 80), SimpleHTTPServer.SimpleHTTPRequestHandler); \ s.serve_forever()"After this, the
certbotclient will verify that the domain is legit and issue a certificate, writing it to your current directory, likely as0000_chain.pem.This
.pemfile is your signed certificate! Once you set it up with a web server, people will be able to securely browse your website.Let’s configure the webserver to use your new certificate to secure requests.
-
Make sure that
nginxis installed, otherwise you won’t be able to view your website.nginxstores its configuration information in/etc/nginx. From the decal-labs repository, add the filea9/nginx-a9.confto the/etc/nginx/sites-enabled/directory. -
Edit
nginx-a9.confusing your preferred text editor and fix it according to the instructions contained therein. -
Rename
nginx-lab9.conftodefaultand reload nginx.11
Now, if you visit https://<you>.decal.xcf.sh, you should see the green lock
in the address bar indicating that your website is secured with HTTPS!
Footnotes
-
https://thehackernews.com/2016/08/github-ssl-certificate.html ↩
-
https://news.ycombinator.com/item?id=10663843 ↩
-
limitations on the size of data that public key crypto can operate over render this option nontrivial and difficult to implement. ↩
-
https://en.wikipedia.org/wiki/SHA1 ↩
-
hint: look at the man page
ssh-copy-idcommand. ↩ -
use of wget is recommended ↩
-
see the
--armoroption ↩ -
GitHub has excellent documentation on creating all kinds of cryptographic keys. ↩
-
There are others too, like ‘l’ for symbolic link ↩
-
$ openssl genrsa 4096 > account.key↩ -
recall lab 6:
systemctl reload nginx↩